DNS in the cloud
When you create a cloud server, it is assigned an IP address. You can access the server by its IP address, but you might prefer to associate the IP address with a domain name such as www.example.com and access the server by that name. You can connect an IP address and a domain name in the following ways:
Use forward DNS to map a domain name to an IP address.
Use reverse DNS to map an IP address to a domain name.
Forward DNS
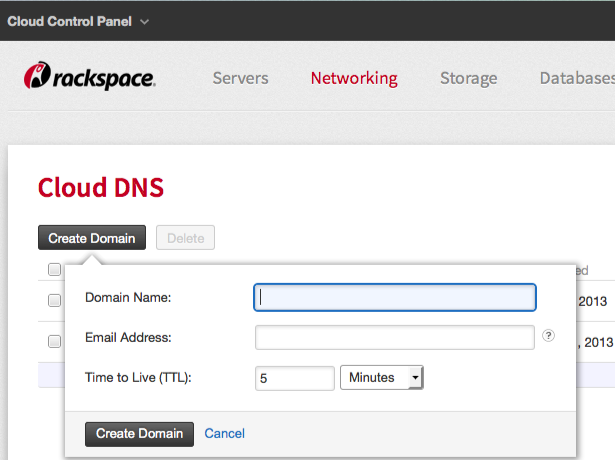
Most DNS lookups are forward DNS lookups, in which a search is based on the DNS name of another computer as it is stored in a host (A) resource record. For example, when you ask your web browser to display www.example.com, you are asking for a forward DNS lookup. To enable users to locate your cloud server by forward DNS lookup, register a domain name, using the registrar of your choice. Then associate the domain name with the server’s IP address. You can use Cloud DNS to associate a domain name with a cloud server. In the Cloud Control Panel, select Networking > Cloud DNS > Create Domain:

Networking > Cloud DNS > Create Domain
For more information about using the Cloud Control Panel to manage DNS information, read Create DNS Records for cloud servers with the Control Panel.
You can also use the Cloud DNS API to manage DNS information programmatically. Begin reading about that in the Cloud DNS API Getting Started Guide.
Reverse DNS
For each cloud server that you create, you can assign a reverse DNS record. A reverse DNS record, also known as a PTR record, is used to assist in the resolution of a specific IP address to a fully-qualified domain name (FQDN) such as mail.example.com.
When you enter a domain name in your browser, the DNS system finds the IP address of the server with which the domain is associated.
A reverse DNS lookup works in the opposite direction. It establishes which domain is associated with the IP address.
Reverse DNS importance with hosted mail servers
Reverse DNS is especially important if you are running an application like a mail server on your cloud server, because many recipient servers reject, or mark as spam, all email that originates from an “unauthenticated” server.
This basically means that after the sending IP address is checked, if the reverse DNS does not match the sending domain, then it is classified as “unauthenticated”.
Note
Having a reverse DNS record attached to your domain does not automatically guarantee acceptance of email that originates from your domain by the recipient’s email server. Having a reverse DNS record for your domain can prevent email that originates from your domain from being immediately rejected. Non-matching or generic reverse DNS lookup settings are often rejected out of hand, but rejection can occur for other reasons.
Creating a reverse DNS record for your cloud server
You can set up a reverse DNS record through the Rackspace Cloud Control Panel by performing these steps:
Log in to your Rackspace account.
In the list of cloud servers, click the link for the server for which you want to add reverse DNS.
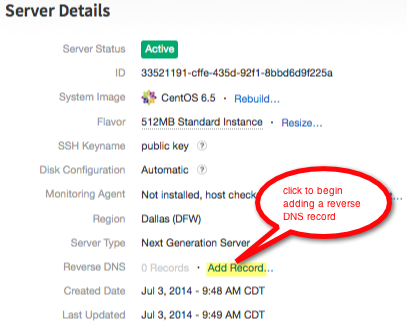
On the Server Details page, click Add Record next to the Reverse DNS option.

While displaying details for a server, click Add Record to begin defining a reverse DNS record.
In the group dialog box, enter the following information:
Enter your domain name (for example mail.example.com) in the Hostname field.
Set the Time to Live (TTL) value for the record.
Click Save Record.
On the Server Details page, one record will be listed next to the Reverse DNS option. Click this link to display the details for the reverse DNS record that you just added.

After adding a reverse DNS record to a server, click 1 Record to confirm the association between the domain name and the server’s IP address.
Troubleshooting your reverse DNS record
If you need to verify or troubleshoot your reverse DNS record, you can use a tool called dig. You can learn about dig at the dig man page.
See also
Understanding Cloud Networks introduces key ideas. To learn how to put these ideas to work, start at Actions for Cloud Networks.