This article describes how to create an image of a cloud server (also known as cloning a server) and restore a server from a saved image in the Cloud Control Panel. For information about using the Cloud Servers API to create an image from a server, see the Create Image section in the Cloud Servers Developer Guide.
Prerequisites#
Notes#
An image can be restored only to a server that has enough system disk capacity to accommodate the data in the image.
Servers that boot from a Cloud Block Storage volume cannot be imaged. Use Cloud Block Storage snapshots to copy the boot volume instead. For more information, see Create and use Cloud Block Storage snapshots.
Images do not include attached data disks or Cloud Block Storage volumes, only a local system disk. Data disks must be backed up using a Cloud Block Storage volume, Cloud Backup, or another backup solution. For more information about Cloud Backup, see Getting started with Rackspace Cloud Backup.
Image backups are designed primarily to speed deployment of new servers and not as a robust backup solution. As such, there are a number of practical limitations in place. You can find a list of these limitations in the next article in the series Cloud Server image limitations.
Create an image backup#
Note: The process of building a server from a previous backup image can be a time-consuming process depending on the size of the server.
Use the following steps to create an image backup:
Log in to the Cloud Control Panel.
In the top navigation bar, click Select a Product > Rackspace Cloud.
Select Servers > Cloud Servers.
Click on the server that you want to clone.
After the Server Information page loads, click Actions and select Create Image.
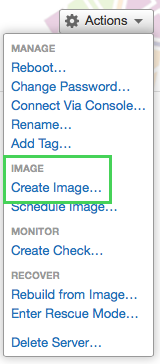
Enter a name for the image and click Create Image.
After the image is saved, it appears in the Images section of the Server Information page.
Restore a server from a saved image#
Use the following steps to restore a server from a saved image:
In the top navigation bar of the Cloud Control Panel, click Servers > Saved Images.
Click the gear icon next to the image that you want to use to build a server.
Select Create Server with Image.
Enter a name for your server and select the region.
In the Flavor section, select the flavor class and configure sizing options.
(Optional) Under Advanced Options, perform the following actions:
Select an SSH key to add to the server’s root account (if available).
Select a Cloud Network to attach the server to.
Choose the disk configuration option to use (if available).
Click Create Server.
When presented with your root admin password, copy the password to a secure location and then click Dismiss Password.

While your server goes through the build process, a Building notification is displayed.
After the server is created, its status is displayed as Active. You can then log in to it by using Remote Desktop Protocol (RDP) for Windows® or SSH for Linux®, depending on your server’s operating system.